Most likely, the portal address in "Settings" are incorrect. Check that it says https: // before portal address, and that there is no / after.
If you needed to adjust, save the connection again and try again to click "Connect".
Read more here about the settings: http://icoordinator.com/en/support/icd-install
On PC you can find the icon for ProjectCoordinator Desktop down to the right if you click on the up-arrow (Notification area). Click on the icon to open the main window for ProjectCoordinator Desktop again. NOTE: You can change settings for that under "Customize" if you want the icon to show all the time or not. Change from "Only show notifications" to "Show icon and notifications" if you want the icon to be shown all the time.
On Mac you always got the icon down in the "Dock" (if you haven't change where it will show). If you click on the icon the main window for ProjectCoordinator will show.
If you get this message, try to click on Connect once again.
If this won't work please restart ProjectCoordinator Desktop again.
In the PC version: Use the Exit-button in the upper left corner to close ProjectCoordinator Desktop.
In Mac version: Choose "Quit ProjectCoordinator Desktop" in the dropdown menu below ProjectCoordinator Desktop, on the upper left side of the screen (beside the Apple symbol).
The security settings in your web browser can stop you from downloading files from the internet. Check your settings and open up for downloading the installation file. How you do it may vary slightly between the different versions of the web browsers.
Extract from the text on Microsoft’s help page:
“About download and security warnings
When you download a file, Internet Explorer checks for clues that the download is malicious or potentially harmful to your PC. If Internet Explorer thinks a download seems suspicious, you'll be notified so you can decide whether or not to save, run, or open the file. Not all files you're warned about are malicious, but it's important to make sure you trust the site you're downloading from, and that you really want to download the file.
If you see a security warning that tells you The publisher of this program couldn't be verified, then Internet Explorer doesn't recognise the site or organisation asking you to download the file. Make sure you recognise and trust the publisher before you save or open the download. Learn more about how SmartScreen helps protect you and Certificate errors that might cause you to see download warnings.
There are always risks to downloading files from the web. Here are some precautions you can take to help protect your PC when you download files:
•Install and use an antivirus program.
•Only download files from sites that you trust.
•If the file has a digital signature, make sure that the signature is valid and the file's from a trusted location. To see the digital signature, click the publisher link in the security warning dialogue box that opens when you first download the file.”
Read more on Microsoft's website here:
http://windows.microsoft.com/en-gb/internet-explorer/download-files#ie=ie-11-win-7
The "Settings" window should show up automatically in front of the bigger window with the logo, when you start up ProjectCoordinator Desktop. Most likely has something happened with your computer. In most cases a restart will solve the problem. If not, you can always click on the button "Settings" to show the window. If your Settings window goes blank/white you can try to click on the X and close it. After that you can click again on the button "Settings" in the big window. Then it should be normal again.
In PC you just click on the button "Settings" in the big window.
In Mac you have to right-click on the ProjectCoordinator Desktop-icon at the bottom (or side) in the Dock. Then you see a contextual menu of additional choices where you can find "Settings" and left-click on it to show the window again.
After you have clicked on the file and opened it with the associated program for example Microsoft Word, you can use "Save as" to choose where to save a copy on your local computer.
Do like this to reset the database password:
In PC:
In Windows 7 and Vista:
Close ProjectCoordinator Desktop completely with the Exit button.
Click at the Start button down to the left of the screen. In the window “Search programs and files” at the bottom you type in “cmd” and press Enter. In the terminal window that shows up you type in: del ”Appdata\Roaming\icdesk\Local Store\icd.db” and press Enter after that. It is not certain that it will work just to use copy/paste. Type in the text just to be sure. Make sure that you type in the correct text line and don’t forget ” both in the beginning and in the end.
Now you can restart ProjectCoordinator Desktop and enter the password again. Note that you have to add the portal/portals again in the Settings window that shows up.
In Windows XP:
Close ProjectCoordinator Desktop completely with the Exit button.
Click at the Start button down to the left of the screen. Click on “Run” (sometimes found under “All Programs”) and type “cmd” and press Enter. In the terminal window that shows up you type in: del ”Application Data\icdesk\Local Store\icd.db” and press Enter. Depending of which version of XP you have, the path could look a little different. The easiest way if it won’t work is to search for the file manually and type in the same path to the file. It is not certain that it will work just to use copy/paste. Type in the text just to be sure. Make sure that you type in the correct text line and don’t forget ” both in the beginning and in the end.
Now you can restart ProjectCoordinator Desktop and enter the password again. Note that you have to add the portal/portals again in the Settings window that shows up.
In Mac:
Close ProjectCoordinator Desktop completely with Quit ProjectCoordinator Desktop in the dropdown menu.
Click on the magnifying glass in the upper right corner (Spotlight) and type in “Terminal”. Click on the name that shows up beneath.
Inside the Terminal window that shows up you type in: rm ”Library/Preferences/icdesk/Local Store/icd.db” and press Enter. It is not certain that it will work just to use copy/paste. Type in the text just to be sure. Make sure that you type in the correct text line and don’t forget ” both in the beginning and in the end.
Now you can restart ProjectCoordinator Desktop and enter the password again. Note that you have to add the portal/portals again in the Settings window that shows up.
If you have enabled protected mode, all files from the web is open in a read-only view. This means you can not edit the files.
To disable protected mode in Microsoft Office 2010, follow the steps bellow:
- Run one of the Microsoft Office 2010 applications (e.g. Word 2010)
- Click on File menu, and select "Options"
- In the “Options” dialog, select "Trust Center" in the left panel
- Click on "Trust Center Settings" in the right panel
- Select "Protected View" in the left panel of “Trust Center” dialog
- Disable one or several of the protected mode options by clicking the checkboxes
- Click "OK"
NOTE: To disable protected mode in every application of the Microsoft Office 2010 pack, you must repeat the procedure
above for each application in Microsoft Office 2010.
If I click on a document, in ProjectCoordinator, I can only save the document locally, I can not edit and save it directly to the portal.
If you have a PC and use Internet Explorer, you can install the DMK component.
When you go to Documents in ProjectCoordinator, there is a button *"Install DMK". *NOTE: This button is removed from version 3.0.2.
Click the button and follow the onscreen instructions.
NOTE: To install and use the DMK component, you must use Windows and Internet Explorer.
Also remember to add your portal to Internet Explorer's Trusted Sites. See the topic: Internet Explorer block windows from ProjectCoordinator
You select and change the language in My Settings. ProjectCoordinator is available in English and Swedish. Follow the instructions in the Online Help for ProjectCoordinator, click on the link below.
How to upload documents is described in the Online Help for Documents under the title Upload documents. Follow the instructions in the Online Help for Project Coordinator, click on the link below.
To avoid blocked windows, (windows that open when you click on toolbar buttons
in the toolbar), do the following settings in Internet Explorer.
- Launch Internet Explorer.
- Log in to the portal.
- Click "Tools" in the menu bar and choose "Internet Options".
- Click the "Security" tab in the window that appears.
- Click "Trusted Sites" in the panel titled: "Select a Web content zone to specify its security settings."
- Click the "Sites" button to open the "Trusted sites" window.
- In case the current ProjectCoordinator portal/room is running securely (https), ensure that “Require server verification (https:) for all sites in this zone” is checked. In case the current ProjectCoordinator portal/room is not running securely (http), ensure that “Require server verification (https:) for all sites in this zone” is unchecked
- Type the website desired to allow (ex.http://ProjectCoordinator.net) into the "Add this website to the zone:" field and click "Add".
- Click "Close" to accept the changes.
- Click "OK" in the Internet Options window to complete the process.
NOTE: Add only web pages you know and can trust in "Trusted Sites".
Read more here: http://office.microsoft.com/en-us/word-help/office-2010-security-protecting-your-files-RZ101665538.aspx?CTT=1
How to change acess is described in the Online Help for Documents under the title Edit properties of documents. Follow the instructions in the Online Help for ProjectCoordinator, click on the link below.
How to create a new user is described in the Online Help for Team under the title Users - creating, editing and deleting.Follow the instructions in the Online Help for ProjectCoordinator, click on the link below.
Users - creating, editing and deleting
Remove stored login information from your PC
- Select Start menu
- Select "Control panel"
- Click on "User Accounts"
- Click on "Manage User Accounts"
- Select "Advanced" tab
- Click on "Manage Passwords" button
- Select the portal from the list "Generic Credentials", (i.e. Yourportal.com) by click on the arrow at the back of the line.
- Select "Remove from vault"
Remove stored login information from your MAC
- Open a new Finder window by click on the icon in the dock
- Navigate to "Utilities" folder, located in the "Applications" section of the Mac hard drive
- Double click on "Keychain Access" icon to open the password utility
- Select "Passwords" in the list of categories in the lower left corner of program window
- Click on the stored password that you want to remove from your computer
- Go to "Edit" in the menu bar and select "Delete".
- Click "Delete" again to confirm your selection
If you have enabled protected mode, all files from the web is open in a read-only view. This means you can not edit the files.
To disable protected mode in Microsoft Office 2010, follow the steps bellow:
- Run one of the Microsoft Office 2010 applications (e.g. Word 2010)
- Click on File menu, and select "Options"
- In the “Options” dialog, select "Trust Center" in the left panel
- Click on "Trust Center Settings" in the right panel
- Select "Protected View" in the left panel of “Trust Center” dialog
- Disable one or several of the protected mode options by clicking the checkboxes
- Click "OK"
NOTE: To disable protected mode in every application of the Microsoft Office 2010 pack, you must repeat the procedure
above for each application in Microsoft Office 2010.
In the default installation of a 64-bit Windows 7, there are two versions of Internet Explorer installed, (one 64-bit Internet Explorer and one 32-bit Internet Explorer).
The 64-bit version of Internet Explorer does not support AktiveX components.
Our DMK component is only compatible with the 32-bit version.
Here is a little instruction how you can run the 32-bit Internet Explorer on a PC with installed Windows 64-bit version:
Run 32-bit Internet Explorer
- Start an Explorer window and navigate to the folder: "C:\Program Files(x86)\Internet Explorer\"
- Double-click the file: "iexplore.exe"
Create a desktop icon to the 32-bit Internet Explorer
- Select and create a shortcut to the file "iexplore.exe" located in the "C:\Program Files(x86)\Internet Explorer\" folder.
- Copy the shortcut to the desktop.
Uninstall DMK component
It may be that the DMK component is not installed correctly, (if you have installed DMK from the 64-bit Internet Explorer).
To be on the safe side uninstall the DMK component and reinstall it from the 32-bit version of Internet Explorer.
- Select Startmenu and select "Control Panel"
- Select "Programs and Features"
- Double-click on the "ProjectCoordinator DMK"
- Select "Yes" in the pop-up window
Install DMK component
- Start the 32-bit Internet Explorer and log in to ProjectCoordinator.
- Go to the Documents folder, now should the *"Install DMK" button be available in the window. *NOTE: This button is removed from version 3.0.2.
- Click the "Install DMK" button to install DMK component, follow the onscreen instructions.
If you click on an review invitation in Safari and get an error message
that a pop-up is blocked and no window appears, change the pop-up settings in Safari:
- Choose "Preferences" from the Safari menu.
- Click the "Security" tab
- Remove the selection in the check box "Block pop-up windows"
NOTE: Off-line functionality is currently not supported by Xythos for MAC
Configure Xythos so that files and folders are available offline
- Start Xythos Drive
- Press the button "Work Online"
- Select first file or folder to be accessible Offline, (select it in the Explorer window that is connected to the server).
- Right-click on the selected file/folder and select "Always Available Offline" from the pop-up menu
- Repeat step 3 and 4 for all files and folders that shall be accessible off-line
- Click on the "Disconnect" button in the Xythos Drive window
- Select the "Offline" tab in the Xythos Drive window and select the setting for how and when synchronization with the server should be performed.
- If you want to synchronize manually, click to deselect "On connection" and "On disconnections", synchronization are then made manually by pressing the button "Synchronize Now", (if you choose this option there is no automatic synchronization).
Working with files and folders Off-line
- Start Xythos Drive
- Press the button "Work Offline", (Xythos driver connects to a "virtual drive" with the same content, and with all the "Remote configured" files and folders, (see above), available in an Explorer window, (it looks like you are connected to the server).
- Navigate to the file in the Explorer window and work with it as if it had been stored on your computers hard drive.
- When you have finished your work, click on the button "Disconnect" in the Xythos Drive window, the "virtual disk" is disconnected
Synchronize the updated files and folders Online
- If automatic synchronization is selected, the synchronization and update of changed files and folders appears when you connect to the server (when pressing the "Online" button in the Xythos Drive window).
- If manual synchronization is selected, the synchronization and update of changed files and folders appears when you press the button "Synchronize Now" in the "Offline" tab in the Xythos Drive window.
- If someone else has updated a file on the server so that the versions of a file is different a pop-up window appears where you can choose the appropriate action.
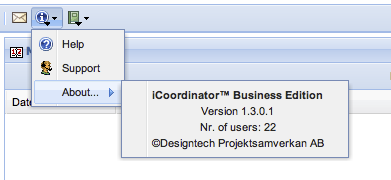
After login to the portal click on the info button located at the top panel and select About as shown in the below figure
Sometimes when opening previous version of an Office file you can experience that nothing happens. The reason can be that a Windows Security window is hiding behind any other window. If you press Alt+Tab you can switch between open programs and windows to find this particular window. There you can click either OK or Cancel, and the file will be opened in for eg. Word.
Note: You can’t edit previous versions of the file.
If you experience this problem first try to hold down Ctrl key+F5 to reload the web page. Otherwise you can try to delete old cookies.
Follow these steps below:
Internet Explorer 9
Open Internet Explorer window.
Click the “Tools” button (often in the upper right corner and looks like a cogwheel).
Click on “Internet options”.
Under the first tab “General” and further down under “Browsing history” you can click “Delete…”.
The window Delete Browsing History appears.
Tick the “Cookies” and “Temporary Internet Files” box, you can uncheck the rest.
Then click “Delete” and then exit and restart your web browser.
Internet Explorer 8
Click "Safety" on the Command bar.
Select "Delete Browsing History".
Select the option for cookies and click Delete.
Alternatively, Internet Explorer 8's new InPrivate browsing feature allows users to browse the internet without recording information from visited sites (including cookies).
To use InPrivate mode:
Click "Safety" on the Command bar.
Select "InPrivate Browsing".
Internet Explorer 7.x
Exit Internet Explorer 7, and then exit any instances of Windows Explorer.
Click Start, click Run, type inetcpl.cpl, and then press ENTER.
On the General tab, click Delete under Browsing History in the Internet Properties dialog box.
In the Delete Browsing History dialog box, click Delete Cookies.
In the Delete Cookies dialog box, click Yes.
Yes, you can use the Subscription function in the Document Management. You do like this to use it:
- If you want to subscribe on some of your stored documents/folders, you choose which documents/folders you want to subscribe on by checking the box behind the document/folder name with the mouse.
- Click the button Subscription on/off
 .
.
NOTE: If you subscribe to a whole folder, you also subscribe to all the files inside that folder. Also new files users upload to that folder will be subscribed. You can choose how often you want the Subscription report. You find it under My Functions/My Subscriptions. There you can set the interval to eg. Instantly, Hourly, Daily, Every other day or Weekly.
Try to click on the web browser’s “Refresh” button or F5. If the log in window appears you have to log in again.
NOTE! In ProjectCoordinator™ a log out time is by default set to two (2) hours. If you try to upload (save) a file after you have been logged out, your file will be saved locally on your computer in C:\Users\[User]\Appdata\Local\Temp.
Normal.dot or Normal.dotm is that blank page you get when you open a new document in Microsoft® Office Word. If this template file gets corrupted, in some cases it can affect ProjectCoordinator when you want to save the files back to the portal. If you get the question about if you want to resave Normal.dot or Normal.dotm, click OK. Otherwise the file won’t be saved back to the portal before you do that.
After that it should work as normal again. This is an issue caused by Microsoft® Office, not ProjectCoordinator™.
Click on the cog wheel (Tools) in IE11 and click on “Compatibility View settings” above “Internet options” in IE11 and add (Add) the address that your portal has (it is pre-filled), then the address moves down one step to the box “Websites you’ve added to Compatibility view”, then click on the button “Close”. After that you can try again. Sometimes you have to log out and log in again. Maybe it want to update DMK, if it is so, do that. Perhaps you have to close down IE11 to update the DMK kit.
NOTE: Remember that your portal have to be added under Trusted sites, otherwise the DMK won’t work.
See here how you do that here: Internet Explorer block windows from ProjectCoordinator
NOTE: In the latest versions of Internet Explorer 11 sometimes DMK won’t work despite our recommended changes. If that's the case, then please install and use ProjectCoordinator Desktop instead. You find instructions and links here: http://www.icoordinator.com/en/downloads
In the default installation of a 64-bit Windows 7, there are two versions of Internet Explorer installed, (one 64-bit Internet Explorer and one 32-bit Internet Explorer).
The 64-bit version of Internet Explorer does not support AktiveX components.
NOTE: Our DMK component is only compatible with the 32-bit version.
Sometimes in the latest versions of Internet Explorer 11 the DMK component won’t work despite our recommended changes:
Problems to open and print documents, Office 2010
Problems with DMK component in 64-bit Windows
I have installed Internet Explorer 11 and now DMK does not work anymore.
If that’s the case then please install and use ProjectCoordinator Desktop instead. You find instructions and links here: http://www.icoordinator.com/en/downloads
Read more about ProjectCoordinator Desktop here: http://icoordinator.com/en/support/online-help/icd
In this version ProjectCoordinator don't support iWorks-files and can't handle them right. We hope to support these file types in the future.
If an activity is completed, and set to 100% in the Activity Planner you can not report any more time on that activity.
It is because this functionality requires that your web browser supports HTML5, and Internet Explorer 9 does not do that. Required HTML5 support is available in the following common browsers:
Safari 7+
Firefox 31+
IE 10+
Chrome 31+
You should use another program for this, examples of such programs are WinRAR (http://www.win-rar.com), WinZip (http://www.winzip.com), TUGZip (http://www.tugzip.com) and 7-Zip (http://www.7-zip.org).
This is because your system does not support the newer TLS 1.2 protocol. You need to add a fix on your computer to solve this. Scroll down to “Easy fix” and click “Download”. Read more on this page: https://support.microsoft.com/en-us/help/3140245/update-to-enable-tls-1-1-and-tls-1-2-as-a-default-secure-protocols-in